


レイアウトコードは次のとおりです。
<?xml version="1.0" encoding="utf-8"?>
<LinearLayout xmlns:android="http://schemas.android.com/apk/res/android"
    android:orientation="vertical"
    android:layout_width="fill_parent"
    android:layout_height="fill_parent">

    <TextView android:text="@string/welcome"
        android:id="@+id/TextView"
        android:layout_width="fill_parent"
        android:layout_height="wrap_content">
    </TextView>

    <LinearLayout android:id="@+id/LinearLayout"
        android:orientation="horizontal"
        android:layout_width="wrap_content"
        android:layout_height="wrap_content"
        android:gravity="bottom">

            <EditText android:id="@+id/EditText"
                android:layout_width="fill_parent"
                android:layout_height="wrap_content">
            </EditText>

            <Button android:text="@string/label_submit_button"
                android:id="@+id/Button"
                android:layout_width="wrap_content"
                android:layout_height="wrap_content">
            </Button>

    </LinearLayout>

</LinearLayout>
左側が現在の外観で、右側が私が希望する外観です。
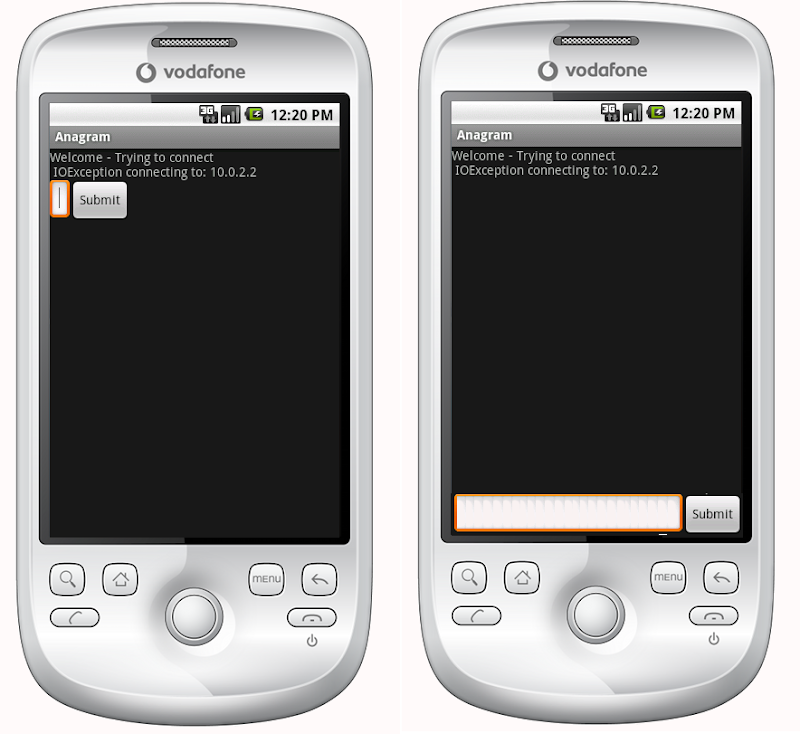
明らかな答えは、TextView の高さを fill_parent に設定することですが、これではボタンや入力フィールド用のスペースが残ってしまいます。
本質的には、送信ボタンとテキスト エントリを下部で固定の高さにして、テキスト ビューで残りのスペースを埋めたいということです。同様に、水平方向の線形レイアウトでは、送信ボタンでコンテンツをラップし、テキスト エントリで残りのスペースを埋めたいと考えています。
線形レイアウトの最初のアイテムに fill_parent を指示すると、まさにそのように実行され、他のアイテムのためのスペースが残されません。線形レイアウトの最初のアイテムが、レイアウト内の残りのアイテムに必要な最小限のスペースを除くすべてのスペースを埋めるようにするにはどうすればよいでしょうか。
相対レイアウトがまさに答えでした。
    <?xml version="1.0" encoding="utf-8"?>
    <RelativeLayout
    xmlns:android="http://schemas.android.com/apk/res/android"
    android:layout_width="fill_parent"
    android:layout_height="fill_parent">

    <TextView
        android:text="@string/welcome"
        android:id="@+id/TextView"
        android:layout_width="fill_parent"
        android:layout_height="wrap_content"
        android:layout_alignParentTop="true">
    </TextView>

    <RelativeLayout
        android:id="@+id/InnerRelativeLayout"
        android:layout_width="wrap_content"
        android:layout_height="wrap_content"
        android:layout_alignParentBottom="true" >

        <Button
            android:text="@string/label_submit_button"
            android:id="@+id/Button"
            android:layout_alignParentRight="true"
            android:layout_width="wrap_content"
            android:layout_height="wrap_content">
        </Button>

        <EditText
            android:id="@+id/EditText"
            android:layout_width="fill_parent"
            android:layout_toLeftOf="@id/Button"
            android:layout_height="wrap_content">
        </EditText>

    </RelativeLayout>

</RelativeLayout>
ベストアンサー1
これを実現する現代的な方法は、制約レイアウトそして、ビューの下部をConstraintLayoutの下部に制限します。app:layout_constraintBottom_toBottomOf="parent"
以下の例では、画面の端と下部に揃えられる FloatingActionButton を作成します。
<android.support.constraint.ConstraintLayout
   xmlns:android="http://schemas.android.com/apk/res/android"
   xmlns:app="http://schemas.android.com/apk/res-auto"
   xmlns:tools="http://schemas.android.com/tools"
   android:layout_height="match_parent"
   android:layout_width="match_parent">

<android.support.design.widget.FloatingActionButton
    android:layout_height="wrap_content"
    android:layout_width="wrap_content"

    app:layout_constraintBottom_toBottomOf="parent"

    app:layout_constraintEnd_toEndOf="parent" />

</android.support.constraint.ConstraintLayout>
参考までに、以前の回答を残しておきます。
ConstraintLayoutが導入される前は、答えは相対レイアウト。
画面全体を埋める相対レイアウトがある場合は、android:layout_alignParentBottomボタンを画面の下部に移動します。
下部のビューが相対レイアウトで表示されない場合は、その上のレイアウトがすべてのスペースを占めている可能性があります。この場合、下部にあるビューをレイアウト ファイルの最初に配置し、残りのレイアウトをビューの上に配置できますandroid:layout_above。これにより、下部のビューが必要なだけのスペースを占め、レイアウトの残りの部分が画面の残りの部分全体を埋めることができます。